
Patient Search and Selection Screen
This screen allows the User to search the registration environment of the platform for patient identifiers and produces a list of matches for the User to review. The registration environment is launched from this screen upon application initiation and a patient search.
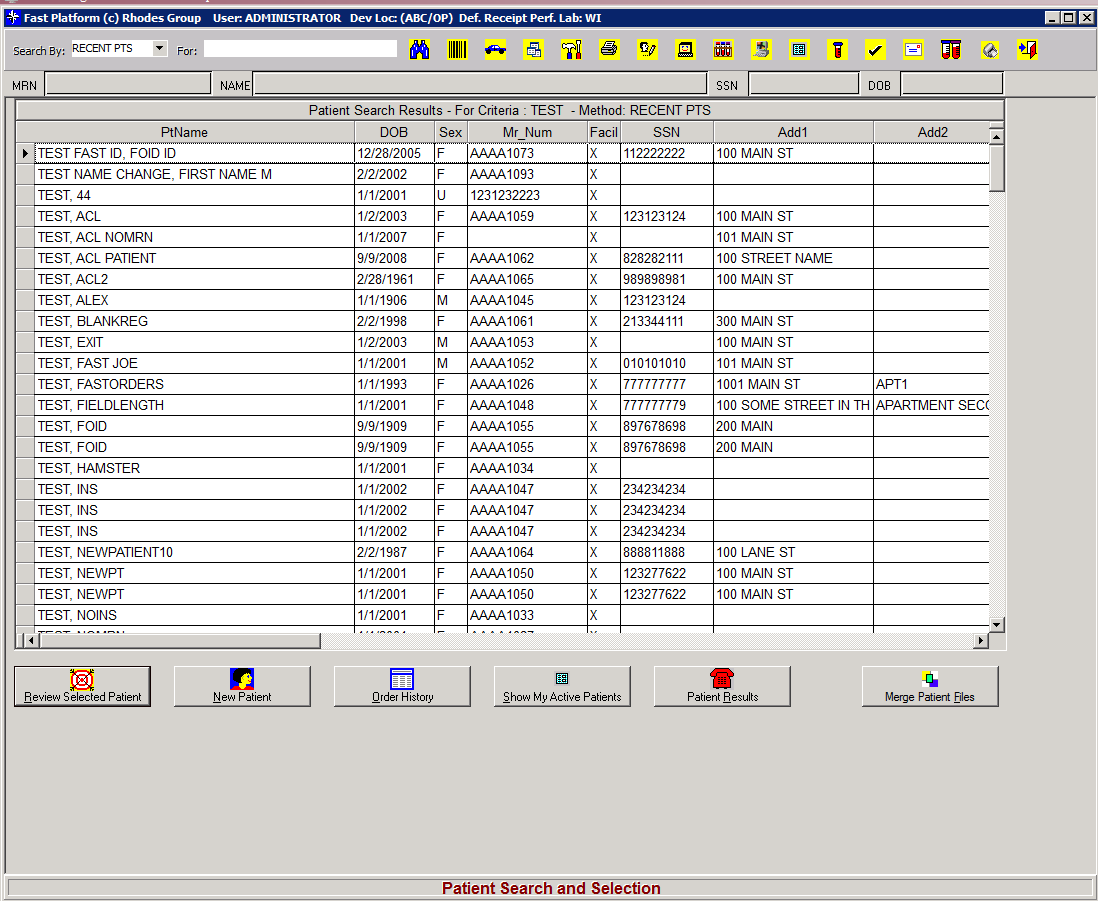
The Patient selection screen is primarily utilized to search for patient of interest. The User is required to search the current database before they have access to create a new patient. This process flow reduces the number of potential duplicate patient files. A limited subset of recent patients accessed can be displayed for easy recall if the appropriate security option is assigned to the User. The search criteria section of the screen remains viable and active throughout the program so that a new patient can be easily selected.
Only the top 200 patients are displayed for each search. If a User enters criteria that result in a higher number of matched records, the User will be prompted to narrow the criteria.
Buttons on the bottom of the screen allow the User to create a new patient, review the selected patient, view order history, show subset of patients, link to results or merge patients.
A User specific default search option can be defined. The System default is configured for the Auto search option. This allows User to search by name, social security number, telephone number, medical record number, Fast Order patient ID for the information entered. CNTRL+S can be used as a hotkey to put the cursor in the search field.
Use the mouse to change the option if needed.
1. Click anywhere in the search by data field to open list.
2. Either arrow down list and press enter when desired selection is hi-lighted.
OR
Mouse click selection to select and close list box.
1. Mouse click the variable data field. This places cursor in field ready for entry.
2. Type the information corresponding to “search by” selection.
3. Click the binoculars button or press enter on your keyboard or double-click on your choice to begin search
4. The system will attempt to search the patient database for a match. The column searched in the database is dependent on the search by criteria selected. Therefore, a number entered in the variable field with a search by criteria of name is unlikely to result in any selections displayed.
5. A successful search will present a table of matching entries for further selection.
6. The common patient data is displayed first with additional columns hidden from view to the right.
7. Use the horizontal scroll bar if one of these columns must be viewed.
8. If too many entries are returned from the search, a vertical scroll bar will enable viewing of the remaining selections.
9. Select the desired patient by clicking anywhere in the row.
10. Highlight row by clicking on left box or double click on it to pick it.
OR
Use pull down arrow or tab to move row selection bar down.
1. Row selection facilitates reading data fields across page.
2. Search options available include
Name
Not case sensitive
Exact match search performed.
Social Security number (SSN)
Enter 9 digits without dashes.
System will validate value using the following rules:
Entry must be 9 characters
All the numbers cannot be the same
The first 3 characters cannot start with ‘111’ or ‘666’
The 4th and 5th character cannot be ‘00’
The last 4 digits cannot be ‘0000’
The 9 digits cannot match one of the SSN reserved numbers
Telephone number (PHONE)
Enter 7 or 10 digit numeric format used for typical entry. (With / without area code)
Normal entry does not store dashes.
Date of Birth (DOB)
Format must be MM/DD/YYYY with slashes or dashes to separate month, day, and year.
Month and day can be single characters, leading zero not required.
Year must be 4 digits.
Accession
Alphanumeric entries accepted.
Requisition Identification Number (REQ ID)
Alphanumeric entries accepted.
Lab Medical Record Number (LAB MR#)
Alphanumeric entries accepted.
Lab Accession
Alphanumeric entries accepted.
Integrated
Alphanumeric entries accepted. (See separate section)
Recent Patients accessed (RECENT PTS)
Entering any data in the variable field will limit the search or do not enter data and all of the recent patients will be returned based on User’s Recent Patient Search Type definition. The variable data for RECENT PTS accepts search data like the AUTO option described below. This field requires you to click on the binoculars to complete the search. The configuration of limiting RECENT PTS searches is presented in details later in section.
AUTO
Entering any data in the variable field for Name, SSN, Telephone number, Medical Record Number or Fast Order Patient ID will retrieve matching entries for any of these options.
Any search in this field must match the requirement stated for the specific search option. i.e.: Medical Record Number must be alphanumeric to be accepted
Multiple Parameter Searching
1. NAME & SSN
2. NAME & MRN
3. NAME & ALT PT ID
4. NAME & HOME PHONE
The User may enter a partial last name and the complete second parameter as: JONES+123456789. This search will produce results even if the patient has not been assigned to the User’s entry group code.
Change Search List Items
The system admin can specify what items appear in the User search list by creating a pipe delimited list of values in the FO_Users.Main_Pt_Srch_List field. If one is not provided, the system uses the default list:
“AUTO|NAME|SSN|PHONE|DOB|ACCESSION|REQ.ID.|Lab MR#|RECENT PTS|Your ID|LAB ACCESSION”
MPI Value Search
The User can search for an MPI value by entering the key word “MPI” followed by a colon and then the foreign patient id, semicolon and then an MPI qualifier. I.e., MPI:123456;1000
The system will then search the MPI tables for a patient match using the foreign ID to the left of the semicolon and the MPI qualifier following the semi-colon.
ACTION BUTTONS
Select a patient and mouse click the Review Selected Patient Button at bottom of screen to return to patient registration screen.
Mouse click the Create New Patient Button at bottom of screen to open a blank patient registration screen.
Select a patient and mouse click the Order History Button at bottom of screen to bypass the patient registration screen and move directly to the requisition/order history screen. If the selected patient has no insurance information and the User has permission chkinsdirectord, then the User is presented with a message and redirected to Patient registration screen. The Order History button is permission based.
My Active Patients button is another mechanism to search the patient’s table. It functions as if no variable data was entered and search option is set to RECENT PTS and uses the current User’s RECENT PTS settings.
Select a patient and mouse click the Patient Result Button at bottom of screen to be redirected to result inquiry. Work with Rhodes to determine if you can utilize this process.
Allows the User to merge patient information through the Patient Merge module. This is described later in the manual.